
There is no cloud, it’s just someone else’s computer.
If you store your data online for free, your data is the product. Big companies are mining your data for targeted advertising, and more recently, to improve their AI models. In this post I will show you how I setup up my home server and how you can do the same to take back control over your data. Do remember though that by taking control of your data, you will also need to take care of your own backups to keep it save.
Architecture
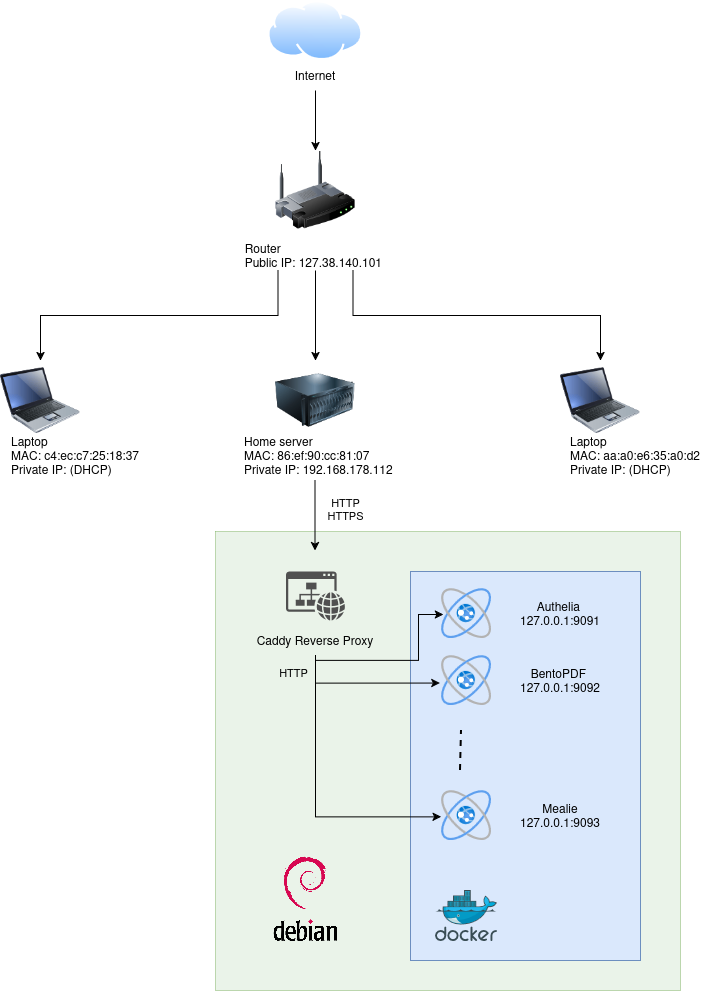
The diagram below shows a simiplified view of how you can setup your home server by following this blog post. The server running Debian Linux is hosted behind a router and only allows http and https traffic using a firewall. A Caddy reverse proxy accepts the http and https connections and forwards it to sites hosted in Docker containers. Authelia is used to provide authentication and single sign-on to protect the sites, even if they don’t support authentication by themselves.
Hardware
Online you will see some conflicting opinions regarding the best hardware for you home server. Some people advocate for old used rackservers or other enterprise gear. On the other side, you also have people recommending an ARM-based single-board computer like the Raspberry Pi 5B or a mini pc with x86 architecture.
Having tried both, I would consider a mini pc or even a used laptop (<10 years old) to be the best hardware for your home server. They will be an order of magnitude more quiet and energy efficient compared to (older) rack-mounted servers. Especially if you are living somewhere with high energy prices, you should not underestimate the power consumption. As an example, a mini pc with a power consumption of 10W that is left on 24/7 for a whole year will consume 87.6 kWh per year. If you pay €0.25 per kWh, this results in about €21.90 per year. A used enterprise grade dual socket server would idle closer at 100W, resulting in an energy cost of €219.00 yearly instead.
For my new home server, I will be using a Soyo M4 Mini which I bought for less than €100 from AliExpress on black friday. It has an Intel N150 processor and 12GB of DDR5 RAM. The processor has four cores and a base power of just 6W. This makes for a very energy efficient server. Some of the other reasons I bought this model include the dual ethernet ports on the back and the USB type-C power port. Unfortunately, I later learned the USB type-C power port requires a special 12V charger and is not compatible with regular chargers.
Operating System
I will run self hosted software in containers using Docker on the Debian operating system. Debian is one of the oldest Linux distributions with a good amount of users. Having many users, there is also a lot of information and documentation around on the internet. I’m going with the latest stable release, Debian 13 Trixie. If you are following along, you can take a look at the official installation instructions or look for the most up to date simplified tutorial you can find.
I used the guided installer and set up full disk encryption. This means your data is encrypted at rest making it unreadable if someone were to get physical access to your machine. At boot time, you enter the encryption password to unlock the data and use the machine as normal. As we are setting up a server, you may not like to connect a keyboard and monitor everytime you restart the server. In a subsequent section we will look into using Dropbear to unlock the machine through SSH. An alternative is setting up another server with Tang/Clevis that will provide your rebooting server with the password to decrypt the data when required.
On the last screen of the Debian installer you can choose which software you want to install by default. You can deselect all the graphical environments and select the ssh server if you want to manage your server remotely through ssh. By installing as few packages as needed you also reduce your potential attack service.
Post installation steps
There are some steps we can take to further secure our system. You don’t really have to worry about hackers specifically targeting your server, but you will see automated bots trying to break in every day. This means the best defense is using strong passwords and not opening up too many attack surfaces.
This is not a full tutorial and only serves as a starting point. I have included some commands from my personal notes should I ever need them again.
Setting up a static IP address
By default your server will probably get a dynamic IP address assigned through DHCP. You can change the network configuration to use a static IP address instead. My preferred way of doing so is through your router’s configuration. Most routers can be configured to create a DHCP reservation that maps a device’s MAC address to a permanent IP address. The MAC address is the unique hardware-based identifier of a network interface and remains static across reboots or operating system reinstallations.
To get your IP address on the server:
$ ip address
2: enp3s0: <BROADCAST,MULTICAST,UP,LOWER_UP> mtu 1500 qdisc fq_codel state UP group default qlen 1000
    link/ether 3c:52:82:9a:4f:1b brd ff:ff:ff:ff:ff:ff
    inet 192.168.178.42/24 brd 192.168.1.255 scope global dynamic enp3s0
       valid_lft 86312sec preferred_lft 86312sec
    inet6 fe80::3e52:82ff:fe9a:4f1b/64 scope link
       valid_lft forever preferred_lft forever
Setting up SSH public key authentication
Instead of using a username and password to login to our server remotely over SSH, we can use public key authentication. This means we create a key pair on our local machine, which consists of a public and private part. We keep the private part on our local machine, but upload the public part to the server. When logging in, the server can use the public key to verify we have the private key and are allowed to login. This is much more secure than a (short) password.
On your local machine:
$ ssh-keygen -t ed25519 -a 100
$ ssh-copy-id -i ~/.ssh/id_ed25519.pub user@your-server-ip
As we have uploaded the public key to the server, we can now disable password based authentication. We will also change the default ssh port from port 22 to 2222, as this will ward off a significant number of attackers using automated scripts.
On your server:
$ sudo nano /etc/ssh/sshd_config
PasswordAuthentication no
PermitRootLogin no
UsePAM no
Port 2222

$ sudo systemctl restart ssh
Setting up a firewall (UFW)
Installing a firewall is always a good idea and UFW is by far the easiest solution available. It’s best practice to disable all incoming connections by default and only open ports if you need to. Outgoing traffic is usually enabled by default because you trust your system. Your server needs outgoing connectivity to fetch package updates, do DNS lookup etc.
On your server:
$ sudo apt install ufw
$ ufw default deny incoming
$ ufw default allow outgoing
$ ufw allow 2222/tcp comment "Open SSH port"
$ ufw allow http
$ ufw allow https
$ sudo ufw enable
$ sudo ufw status verbose
Status: active
Logging: on (low)
Default: deny (incoming), allow (outgoing), disabled (routed)
New profiles: skip

To                         Action      From
--                         ------      ----
2222/tcp                   ALLOW IN    Anywhere                   # Open SSH port
80/tcp (HTTP)              ALLOW IN    Anywhere
443/tcp (HTTPS)            ALLOW IN    Anywhere
2222/tcp (v6)              ALLOW IN    Anywhere (v6)               # Open SSH port
80/tcp (v6)                ALLOW IN    Anywhere (v6)
443/tcp (v6)               ALLOW IN    Anywhere (v6)
Setting up fail2ban
Fail2ban runs in the background and analyzes logs for repeated failed login attempts and temporarily bans the source IP address. Even though we have disabled password based authentication for SSH, malicious brute-force scripts will still attempt to login. Usually, they will try a list of popular passwords like welcome123 and password which can flood our logs. It also helps if we accidentally forgot to disable password based login for SSH and adds a layer of defense.
On your server:
$ sudo apt install fail2ban
$ sudo nano /etc/fail2ban/jail.local
[DEFAULT]
banaction = ufw

[sshd]
enabled  = true
port     = 2222
logpath  = %(sshd_log)s
backend  = systemd

maxretry = 3
findtime = 10m
bantime  = 1h

# Escalate bans for repeat offenders
bantime.increment = true
bantime.factor    = 2

$ sudo systemctl restart fail2ban
$ sudo fail2ban-client status sshd
Setting up unattended updates
When unattended updates are enabled, your server can automatically install critical security updates without user interaction. This means that security vulnerabilities in the software you run will be resolved automatically before you even read about them in the regular news. Usually these updates do not even require a reboot and your system remains available.
On your server:
$ sudo apt install unattended-upgrades
$ sudo dpkg-reconfigure unattended-upgrades
$ sudo unattended-upgrade -d
Setting up Dropbear
We have set up full disk encryption, which means you need to enter a password before the operating system boots and your services start running. The environment where you enter your decryption password is the initramfs and is not encrypted. Instead of typing the password on a keyboard connected to your server, you can also enter if over SSH using Dropbear. We will install Dropbear to run in the initramfs environment and use it to host an SSH server that can decrypt our data. It’s completely separate from our normal SSH server and UFW firewall setup.
First we configure Dropbear to run an SSH server with port forwarding disabled on port 2221 that runs the cryptroot-unlock command as you log in. We choose a different port than the regular SSH server as you will otherwise run into a known host fingerprint warning later on. On your server:
$ sudo apt install dropbear-initramfs
$ sudo nano /etc/dropbear/initramfs/dropbear.conf
DROPBEAR_OPTIONS="-I 120 -j -k -p 2221 -s -c cryptroot-unlock"
Next we copy over our SSH public key from our local machine and add it to the authorized keys. On your local machine:
scp /home/user/.ssh/id_ed25519.pub user@your-server-ip:~/dropbear_key.pub
On your server:
$ cat dropbear_key.pub >> /etc/dropbear/initramfs/authorized_keys
$ rm dropbear_key.pub
$ update-initramfs -u
$ sudo reboot
Next, we verify we can unlock the server over SSH. On your local machine:
$ ping your-server-ip
$ ssh -p 2221 root@your-server-ip
$ ssh -p 2222 user@your-server-ip
Installing Docker
We will use Docker to run our software in containers. You can download it from the Debian repositories, but this version is often out of date. Docker recommends us to add their own APT repository instead to ensure timely access to security updates and new features. The packages are signed with their own Docker GPG signing key, so we will have to add this key to our list of trusted keys. It’s best to check the official installation instructions on the Docker website.
To trust the Docker GPG signing key on your server:
$ sudo apt update
$ sudo apt install ca-certificates curl
$ sudo install -m 0755 -d /etc/apt/keyrings
$ sudo curl -fsSL https://download.docker.com/linux/debian/gpg -o /etc/apt/keyrings/docker.asc
$ sudo chmod a+r /etc/apt/keyrings/docker.asc
Add the Docker repository to the APT sources on your server:
$ sudo tee /etc/apt/sources.list.d/docker.sources <<EOF
Types: deb
URIs: https://download.docker.com/linux/debian
Suites: $(. /etc/os-release && echo "$VERSION_CODENAME")
Components: stable
Signed-By: /etc/apt/keyrings/docker.asc
EOF
Install Docker from the newly added Docker repository on your server:
$ sudo apt update
$ sudo apt install docker-ce docker-ce-cli containerd.io docker-buildx-plugin docker-compose-plugin
$ sudo systemctl status docker
$ sudo systemctl start docker
$ sudo systemctl enable docker
$ sudo usermod -aG docker $USER
When running a container you can publish a port on your host system to forward traffic to the container. For example, traffic from port 8080 on your host system can be forwarded to a webserver running on port 80 in the container. By default Docker does not respect our previously created firewall rules and will automatically add an entry to allow traffic to port 8080 after publishing it. We don’t want this, so we will only publish the ports on the local loopback network interface (127.0.0.1) and run our software behind a reverse proxy.
Installing the Caddy reverse proxy
We will use Caddy as a reverse proxy. A reverse proxy accepts incoming requests and forwards it to backend webservers, such as our software running in a Docker container. Forwarding is done based on a (sub) domain or URL path and allows us to host multiple websites on a single machine. We choose Caddy instead of Nginx or Apache because it has very simple configuration and built-in support for automatic HTTPS.
The installation procedure is comparable to the steps taken for Docker. On your server:
$ sudo apt install -y debian-keyring debian-archive-keyring apt-transport-https curl
$ curl -1sLf 'https://dl.cloudsmith.io/public/caddy/stable/gpg.key' | sudo gpg --dearmor -o /usr/share/keyrings/caddy-stable-archive-keyring.gpg
$ curl -1sLf 'https://dl.cloudsmith.io/public/caddy/stable/debian.deb.txt' | sudo tee /etc/apt/sources.list.d/caddy-stable.list
$ chmod o+r /usr/share/keyrings/caddy-stable-archive-keyring.gpg
$ chmod o+r /etc/apt/sources.list.d/caddy-stable.list
$ sudo apt update
$ sudo apt install caddy
To allow HTTP (port 80) and HTTPS (port 443) we will update the firewall rules:
sudo ufw allow http
sudo ufw allow https
sudo ufw reload
You do not need to open up any other ports. In a following section we will configure Caddy to redirect web traffic to our selfhosted sites bound to the local loopback interface (127.0.0.1).
Selfhosting software
This section goes into depth how to install and configure software to selfhost through an example. It details a pattern that can be repeated for (almost) anything you would want to selfhost.
Docker compose
Docker compose can help define (multi) container applications with a yaml file. The file describes everything needed for your application to run, from networking to volume mounts and environment variables. It’s easy to put in source control and can be used to start the application with a single command. I generally create a folder for each application I intend to selfhost. Within that folder I create my docker-compose.yml file and some subfolders to store application specific data.
As an example we will look at a simple Nginx webserver that hosts the default web page. On your server:
$ mkdir helloworld
$ cd helloworld
$ nano docker-compose.yml
version: "3.8"

services:
  web:
    image: nginx:alpine
    ports:
      - "127.0.0.1:8080:80"

$ docker compose up -d
$ curl localhost:8080
$ docker compose down
The curl command should print the raw html of the default Nginx web page. Now we will look at how to customize this web page by using a volume mount and writing our own html:
$ pwd
~/helloworld
$ mkdir html
$ nano html/index.html
<!DOCTYPE html>
<html>
  <head>
    <title>Hello World</title>
  </head>
  <body>
    <h1>Hello World!</h1>
    <p>This page is served from a mounted volume.</p>
  </body>
</html>

$ nano docker-compose.yml
version: "3.8"

services:
  web:
    image: nginx:alpine
    ports:
      - "127.0.0.1:8080:80"
    volumes:
      - ./html:/usr/share/nginx/html:ro

$ tree
.
├── docker-compose.yml
└── html
    └── index.html

1 directory, 2 files

$ docker compose up -d
$ curl localhost:8080
$ docker compose down
The container’s port is bound to 127.0.0.1 to prevent accidental exposure without the reverse proxy. Another thing you need to know about Docker containers is that whatever happens in the container stays in the container, unless you use a volume mount. That means that if your website is accepting file uploads, you need to create a volume mount such that the file uploads are stored on the host file system. Otherwise, you will lose the files as soon as the container is stopped and removed.
Adding authentication with Authelia
You may want to protect your selfhosted software behind a login. As not all selfhosted software implements authentication in the same way, or even at all, you can configure forward authentication. Forward authentication is a simple way to implement single sign-on. The Caddy reverse proxy will forward traffic to an authentication service like Authelia. Authelia will check if the request has a valid session cookie before forwarding the request to the relevant backend. If the request does not have a valid session cookie, the user is presented with a login form instead. Once the user is logged in, the session cookie is set and subsequent requests will not require another login until the session expires.
Authelia works with a couple of backends to manage users and credentials. If you don’t expect more than a couple of users, using the postgres backend will be overkill. Instead, I will show an example of how to use the simple file-based backend.
On your server:
$ mkdir ~/authelia

$ nano ~/authelia/docker-compose.yml
version: "3.9"

services:
  authelia:
    image: authelia/authelia:latest
    container_name: authelia
    volumes:
      - ./config:/config
    ports:
      - "127.0.0.1:9091:9091"
    restart: unless-stopped

$ mkdir ~/authelia/config
$ nano ~/authelia/config/configuration.yml
jwt_secret: "<some long string>"

notifier:
  filesystem:
    filename: /config/notification.txt

authentication_backend:
  file:
    path: /config/users.yml

access_control:
  default_policy: deny
  rules:
    - domain: "*.yourdomain.com"
      policy: one_factor

session:
  # This secret can also be set using the env variables AUTHELIA_SESSION_SECRET_FILE
  secret: '<another long string>'

  cookies:
    - name: 'authelia_session'
      domain: 'yourdomain.com'  # Should match whatever your root protected domain is
      authelia_url: 'https://authelia.yourdomain.com'
      expiration: '1 hour'
      inactivity: '5 minutes'
      default_redirection_url: https://login.yourdomain.com

storage:
  encryption_key: '<yet another long string>'
  local:
    path: /config/db.sqlite3
Now we need to generate a hashed password for our user:
$ docker run --rm authelia/authelia authelia crypto hash generate argon2 --password <user password>
Next, let’s create the authentication backend file called config/users.yml:
$ nano ~/authelia/config/users.yml
users:
  yourusername:
    password: "<your hashed password (output from previous command)>"
    displayname: "<your username>"
    email: <your email>
Finally, we can start authelia and continue with the reverse proxy configuration.
$ cd ~/authelia
$ docker compose up -d
Caddy configuration
Caddy is quite easy to configure as a reverse proxy for our needs. There are only two things you need to do before you start. First, you need your own domain name with an A record pointing it to your public IP address. Second, you need to configure port forwarding on your router to forward requests to port 80 and 443 to your server. If your public IP address is not static, you can look into a Dynamic DNS (DDNS) provider that allows you to update the IP address automatically with a (cronjob) script.
We will create two sites: one accessible without authentication and another that requires authentication with Authelia hosting the helloworld application from before. On your server:
$ sudo nano /etc/caddy/Caddyfile
insecure.yourdomain.com {
	respond "Caddy is working" 200
}

login.yourdomain.com {
	reverse_proxy 127.0.0.1:9091
}

secure.yourdomain.com {
        forward_auth 127.0.0.1:9091 {
                uri /api/verify?rd=https://login.yourdomain.com
        }

        reverse_proxy 127.0.0.1:8080
}

$ sudo caddy validate --config /etc/caddy/Caddyfile
$ sudo systemctl reload caddy
That’s all we need to really configure. If all went well, you should be able to open a browser and navigate to insecure.yourdomain.com and secure.yourdomain.com. The first one will be accessible without logging in and displays the text “Caddy is working”. The latter will redirect you to a login form to login, after which a session token is set and you are redirected to the customized helloworld website hosted in an Nginx Docker container.
There is no need to manually configure HTTPS. When Caddy is configured with a valid domain name, it automatically enables HTTPS and obtains a TLS certificate from Let’s Encrypt using the ACME protocol. This means it will prove your ownership of the domain by temporarily serving a special token, after which Let’s Encrypt will verify the token and generate a certificate. There’s no need to setup a renewal job either as the certificate will be automatically renewed before it expires without downtime. By default, HTTP requests are redirected to HTTPS, ensuring that credentials and session cookies are never transmitted over an unencrypted connection.
What to host
Below I have included a list of software that might be interesting to host yourself. I have not had the time to test all of it, but I have taken inspiration from online sources and believe it will be a good starting point. All of the mentioned software is open-source.
-
Authelia: Authentication and authorization server that provides single sign-on (SSO) functionality for web applications. In a home server setup it can be used with forward authentication and a file-based user database. If you want more, you can also configure a Postgres user database, access control policies and integrate it with external identity providers.
-
BentoPDF: Tool for working with PDF files. It supports all PDF operations like split, merge, redact, and signing.
-
Bookstack Platform for storing and organizing data. Use it for notes and documentation. Built-in support for diagrams.net and export functionality to PDF.
-
Cyberchef Tool for encryption, encoding, compression and so forth. My favourite operations are base64 decode, JSON beautify and JWT decode. The operations can even be chained and it’s a very useful tool overall.
-
Forgejo For git repositories, like a selfhosted GitHub or Gitlab. It has integrated support for CI jobs similar to GitHub Actions.
-
Mealie Manage your recipes and meal plans. I intend to use this for storing family recipes and meal prepping when I move out.
-
Paperless-ngx Organize your letters and PDFs using tags. Offers full-text search based on OCR.
Summary
All in all, I think it’s a good idea to look into and maybe start with self hosting. It does, however, take away quite a bit of time and I personally still use some cloud providers out of convenience. It’s important to keep security in mind from the start and I hope this post helped you discover something new. For me, this post will serve as documentation as there is nothing worse than your services breaking when you least expect it and having no recollection of how you implemented them.